Top 4 Economical DIY Wedding Appliances
To show your own DIY articles on your wedding must bring more surprises to your guests. Also, they will feel receiving more respect from you. In an era when printing type faces are used anywhere and anything can be bought by money, DIY goods especially become more precious. As a bride with great originality, why not try a DIY item for your nuptial? Below, four unique DIY appliances for wedding are reviewed. It won’t be difficult to make one personally. These top 4 economical DIY wedding appliances are unique and environment friendly, Just follow below steps shared by Katherine.
Top 1: DIY Artistic Candlestick

DIY Artistic Candlestick – Top 4 Economical DIY Wedding Appliances
Inspiration to make these artistic candlesticks roots in the most natural flowers. They are like small elfins. Why not enhance the fresh & romantic sense of your wedding via these candlesticks in dark and light colors? A clever bride will know it’s not difficult to make one here, right? First of all, prepare some pigments, oil paints and several glasses in the same size. Then, be confident to explore your mind. Daub your favorite color on two sides of the glass. It’s okay to blend pure white with red. Also, you can mix various brilliant hues.
Top 2: DIY Table Tablet

DIY Table Tablet – Top 4 Economical DIY Wedding Appliances
Stuff Required:
- Sticks
- Dried Moss
- Fabric
- Basin
- Paint
- Sewing Machine
- Needle
- Thread
- Brush
- Kraft
- Cotton

DIY Table Tablet – Stuff Required
Procedure:
Step 1: Get two pieces of paper that are 8.5cm wide and 11cm long. Print a circle and number on both of them.
Step 2: Cut off the circle and number.
Step 3: Overlap two pieces of paper.
Step 4: Sew the cut numbers onto the round cloth.
Step 5: Sew two circles together, with a small opening left.
Step 6: Insert cotton into the circle. In this case, the ball seems much more vivid.
Step 7: Insert the stick into the circle and fix it by kraft.
Step 8: Glue the kraft. It’s okay to leave some kraft outside for a different effect.
Step 9: Finally, insert the finished flower.
Top 3: DIY Jar Table Tablet

DIY Mason Jar Table Tablet – Top 4 Economical DIY Wedding Appliances
Stuff Required:
- Glass pots in different sizes
- Paperboard
- Glue
- Silver Sand
- Red Cloth
- Hemp Rope
Procedure:

DIY Jar Table Tablet – Top 4 Economical DIY Wedding Appliances
Step 1: Wash glass pots and dry them in the air.
Step 2: Print numbers via computer which occupy half of the glass pot body.
Step 3: Daub the numbers to be white via correction fluid or water color brush and then cut off the redundant part.
Step 4: Make a funnel via a piece of A4 paper. Pour the silver sand into the transparent glass pot.
Step 5: Draw down the shape of glass pot on the red cloth.
Step 6: Draw another larger circle at 1cm aside the edge. Cut off the larger circle, with some saw tooth-shaped patterns left.
Step 7: Fix the cloth at the opening of the glass pot via hemp rope. So, it’s finished.
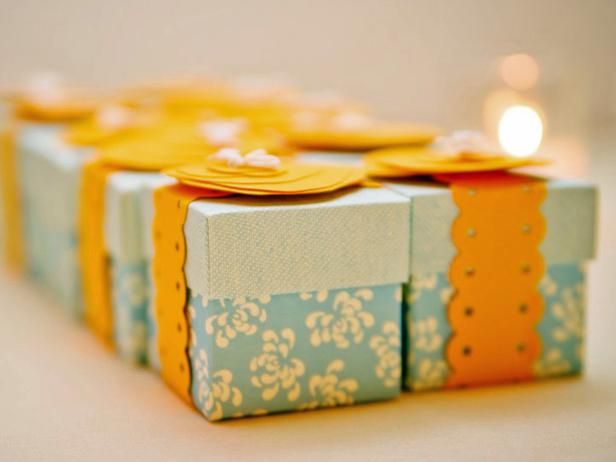
Top 4: DIY Wedding Candies Packing Bag

DIY Wedding Candies Packing Bag – Top 4 Economical DIY Wedding Appliances
Stuff Required:
- Clamp
- Small-shaped Man-made Flowers
- Adhesive Tape
- Red Packing Paper
- White glue
- Pure-colored Card
- White Roller ball pen
- Small-sized Clothes Peg
Procedure:
Step 1: cut all flowers to be the same size about 4 to 5cm long.
Step 2: glue the bottom of flowers via adhesive tape. 5 to 6 bunches can be bonded.
Step 3: cut the paperboard according to the length of flowers.
Step 4: daub the white glue onto both sides of the paperboard.
Step 5: fix the flowers and paperboard onto the red packing paper at the place you like.
Step 6: select the color harmonious to the packing paper and cut a small logo on it.
Step 7: write down words you want to say and fix them by clothes pegs. Then, it’s finished.

DIY Wedding Candies Packing Bag – Procedure
So, these top 4 economical DIY wedding appliances are not too difficult, right?


brilliant ideas. thanks