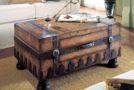
DIY Herringbone Wood Toy Box Storage Ottoman
This is one excellent DIY storage space project you can make use of around a kid’s room, but it will take a bit of work to complete it. One thing we can agree upon is that most storage around homes seems to be specifically aimed at certain areas, such as closets, attics and basements. We often ignore the perfectly feasible opportunities to use certain boxes and even furniture to create useful and secure storage for all our needs. Such storage solutions can be a perfect addition to any home with their own aesthetics that go beyond the usual and quite boring storage options we have been conditioned to use. Beginning with the following tips, you can make a wonderful storage ottoman for your kid’s room in a few easy steps:

Do it Yourself
Start measuring
Using a measuring tape you should work on determining the measurements for cutting some pine strips for a herringbone pattern. The rule of thumb here would be to cut things appropriately and to size within the required measurements so you can have a herringbone look. You will need pine strips to make it happen, something of a width of about 3” and a length of about 6”, which is more or less the standard length and width of subway tiles.
Cutting to size
Once the previous step is done, you will need to mark your strips of pine to 8’ of size, and then follow that up by cutting them with a chop saw. This will allow you to handle things without too much hassle involved.
Drill holes into your pine strips
Once you have enough pine strips to create your final product for the outside panels of your toy box, you will need to stack them four high, then use a drill bit to deal with this step. You would do well to start your work at about ½“ toward the inner side of each of the four corners to create the pilot holes. This will allow you to place things in a symmetrical fashion once you’re done. Mark the center points of the outside panels once you’re done as well.
Measure and mark the pitch
You can use a speed square to allow the proper pitch to create the pattern you need from each of the strips of pine. Look for a pitch of about 45 degrees for best results.
Attaching wood strips
You will then need to pitch; mark and install cut strips starting from the center point. Use wood glue on the back, and then place them in the right position to make it happen. Once each strip is held securely in place, you should work on adding four tacks into each of the holes using a hammer. Make sure you attach the rest of the strips fro center point and all the way along the uncovered half as well.
Applying stain
You can stain the surface of the pine strips with a mini roller or a brush to create an aged look. Use some rags to wipe out the excess and let it dry out completely before moving on to the next step.
Installing router handle holes
In order to have a consistent pattern, you will need to ensure you have the pine strips attached over the handle holes. Uncover the holes for the handles by using a drill and a 1” drill bit to get it done.
Sealing the surface
Once you handle all holes and you cover them with a routing tool, then you will need to add a coat of wood sealer alongside the pine strips by using a paintbrush.
Attaching casters and the lid
Once you deal with the previous step, you will need to flip the toy box to the side and then attach the casters at exactly 1” in each edge using a drill and wood screws. Once you do that, you will need to cover the precut pine tom with some fabric and batting, using a staple gun alongside upholstery staples. Attach a piano hinge along the lower side of the toy box and you’ll be done in no time.

Herringbone Wood Toy Box
Mobile and home storage Shoreditch can help you with more ideas.


Comments are closed.